

Have you ever wanted to bring the adorable world of Sanrio to life with your own hands? Drawing Hello Kitty, that charming little friend with a bow, can seem a bit tricky at first, yet it is almost surprisingly simple once you know the basic shapes. This guide is here to help you create your very own version of the beloved character, giving you a wonderful way to express your creative side. So, get ready to make some art that will surely bring a smile to your face.
Welcome, artists and Hello Kitty fans! If you’ve ever wanted to learn how to draw the world’s most lovable kitty, this is the perfect place to start. We are going to follow along with us and learn how to draw Hello Kitty, step by step, making sure every part of the process feels clear and easy to manage. This intuitive guide is perfect for beginners and kids, allowing everyone to master drawing this beloved Sanrio character in minutes, which is really quite neat.
This drawing tutorial by Tatyana Deniz is designed to be very approachable, helping you to easily draw a perfect Hello Kitty. You will discover that all ages will be able to follow this intuitive guide and master it quickly, turning simple shapes into a recognizable and sweet image. It’s a printable resource, too, that guides you on how to draw Hello Kitty and includes a final page with outlines for coloring, as well as an extension exercise designed to inspire creativity in children, so that is rather thoughtful.
Table of Contents
- Getting Ready: What You Need
- The Basics of Hello Kitty's Shape
- Building the Rest of Hello Kitty
- Tips for Your Hello Kitty Art
- Making Your Drawing Pop: Coloring and Creativity
- Common Questions About Drawing Hello Kitty
- Keep Drawing and Exploring!
Getting Ready: What You Need
Before you begin your artistic adventure, it’s a good idea to gather a few simple supplies. You won't need anything too fancy, just some basic items that most people have around the house or can get very easily. A regular pencil is probably the most important tool, as it lets you sketch lightly and erase any lines you might want to change. A good eraser is also pretty helpful for those little adjustments, you know, just to clean things up.
You will also want some paper, of course. Any kind of drawing paper or even plain printer paper will do just fine for this project. If you plan to color your Hello Kitty drawing later, you might want to pick paper that can handle crayons, colored pencils, or markers without bleeding through too much. Having a comfortable space to draw, maybe a table with good light, can really make the whole experience more enjoyable, too it's almost a necessity.
Some people like to have a fine-tipped black pen or marker for outlining their drawing once they are happy with the pencil sketch. This step makes your Hello Kitty stand out and gives her a finished, polished look. If you are feeling extra creative, grab some coloring supplies like crayons, markers, or colored pencils. These will help you add all the cheerful colors to your masterpiece, which is, you know, part of the fun.
The Basics of Hello Kitty's Shape
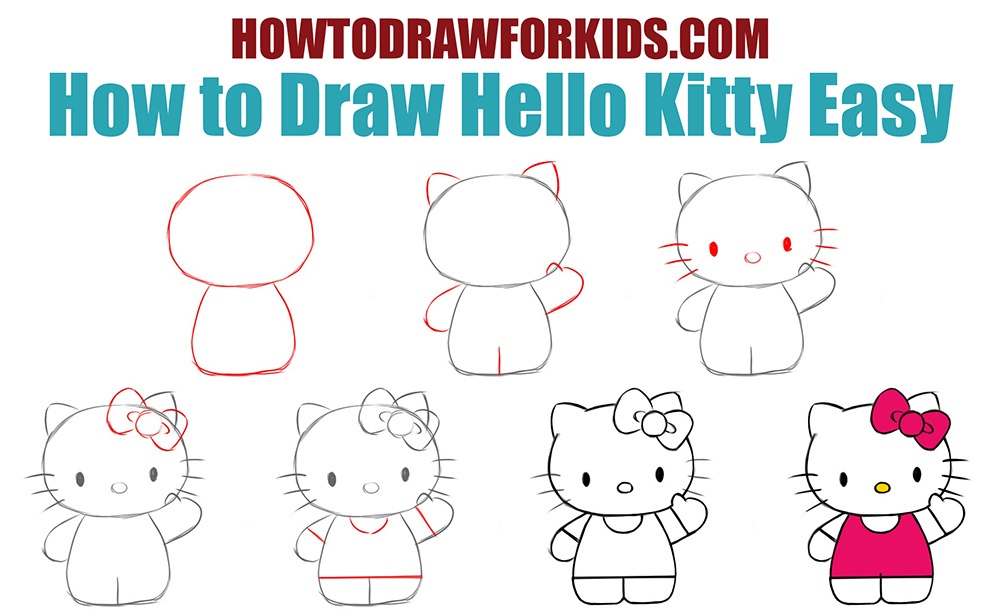
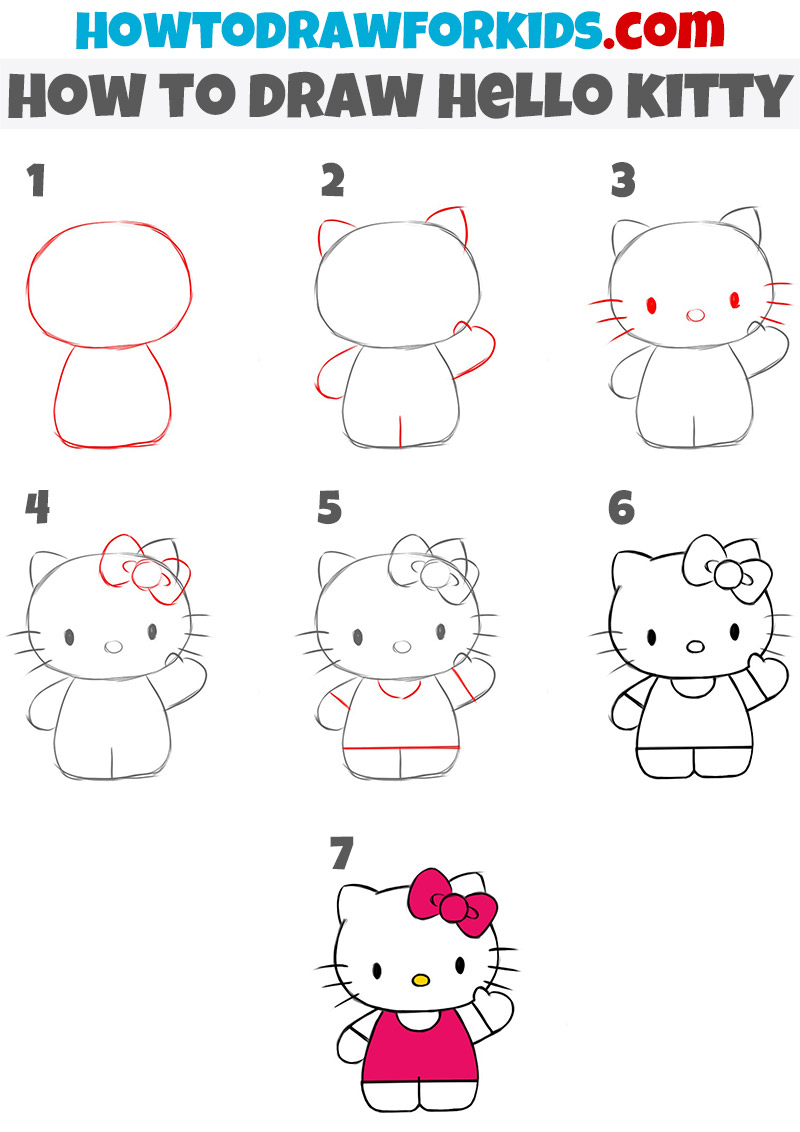
Drawing Hello Kitty starts with some very simple shapes, which is rather nice for anyone just beginning. She is built from basic forms that are easy to put down on paper, and then you just refine them a little bit. Thinking about her as a collection of ovals and circles makes the process much less intimidating, you know, kind of like building with blocks. This method helps you get the proportions right from the very start.
The key is to draw lightly at first. You can always press harder later when you are sure about your lines. This light touch allows you to correct mistakes without leaving marks on your paper, which is pretty useful. It’s like a gentle warm-up for your hand and your eyes, preparing you for the more specific details you will add later. So, take your time with these initial shapes.
Starting with the Head
To draw Hello Kitty, start by drawing a large, horizontal oval for the head. This oval should be slightly wider than it is tall, giving her that recognizable, rounded head shape. Think of it like a somewhat squashed egg lying on its side, that's a good way to picture it. This shape will serve as the main foundation for her entire face and is, you know, really important for getting her look right.
Make sure this oval is placed nicely in the center of your paper, leaving enough room for her body and bow later on. You don't want her head to be too close to the edge of the page, or you might run out of space for the rest of her. This initial oval is probably the most important part of the whole drawing, as it sets the scale for everything else you are going to add, so take a little extra care here.
You can sketch this oval a few times if you need to, until you get a shape that feels right to you. Remember, it's just a guide, so it doesn't have to be absolutely perfect right away. The beauty of drawing is that you can always adjust things as you go, which is, you know, part of the process. This first step is really about getting the overall size and placement correct, which is a pretty big deal.
Adding Her Sweet Face: Eyes and Nose
Once you have your head oval, the next step is to add Hello Kitty's charming facial features. These are also made from simple oval shapes, making them very easy to place. Her face is rather minimalist, which is part of her appeal, so getting these few elements in the right spot is key to capturing her expression, you know, her sweet look.
Then, inside that large oval for the head, draw two smaller ovals for the eyes. These eyes should be placed somewhat high on the head, and they are typically simple, solid ovals without pupils or much detail inside them. They are usually black, giving her a very classic, somewhat innocent gaze. Make sure they are spaced evenly apart, not too close together and not too far apart, you know, just right.
After the eyes, draw a smaller oval in between them for the nose. This nose oval is usually a bit wider than it is tall, and it sits slightly below the line of the eyes, centered between them. Hello Kitty's nose is typically yellow, adding a nice bit of color to her face. This little oval really completes her facial structure, giving her that characteristic Hello Kitty appearance, which is, you know, pretty recognizable.
These three ovals—two for the eyes and one for the nose—are the core of Hello Kitty's face. They are placed in a way that gives her a very friendly and approachable look. Don't worry too much about making them perfectly symmetrical; a little bit of natural variation can actually add charm to your drawing. Just focus on getting the general placement and size right, which is, you know, the main goal here.
Building the Rest of Hello Kitty
With her head and face in place, you are ready to start building the rest of Hello Kitty's body. This part involves adding her iconic bow, her body, and her limbs. These steps also use simple shapes and lines, continuing the easy-to-follow approach we've used so far. You'll find that once the head is done, the rest of her comes together pretty quickly, which is, you know, a nice feeling.
Remember to keep your lines light as you sketch, especially for the body, so you can easily adjust the proportions. Hello Kitty has a very distinct, somewhat plump and rounded shape, so avoid making her too thin or too angular. Her design is all about softness and friendliness, and her body shape reflects that, so that is rather important.
Creating Her Iconic Bow
One of the most recognizable features of Hello Kitty is her bow, which is always placed on her left ear. To draw this, you will first need to add her ears. Draw two simple, rounded triangle shapes on top of her head, one on each side. They should be somewhat small and point slightly outwards, like a cat's ears, which is, you know, pretty standard.
Now, for the bow itself, focus on the left ear (her left, which is your right as you look at the drawing). Draw two rounded, somewhat puffy shapes that meet in the middle, forming the loops of the bow. In the very center where these two shapes meet, draw a small circle or oval for the knot of the bow. This bow is usually red, making it a very bright and cheerful part of her design, and it's pretty essential for her look.
The bow should look full and soft, not flat. You can add a couple of very light lines within the loops to suggest folds or creases, giving it a bit more dimension. This little detail really helps the bow look more realistic and less like a simple flat shape. It's a small touch, but it makes a big difference, you know, for the overall appearance.
Shaping Her Body and Limbs
Hello Kitty's body is also very simple and rounded. Below her head, draw a somewhat plump, oval-like shape for her torso. It should connect smoothly to the bottom of her head, making her look like one continuous, soft figure. Her body is typically a bit wider at the bottom than at the top, giving her a stable and cuddly appearance, which is, you know, part of her charm.
For her arms and legs, draw simple, rounded shapes that extend from her body. Her arms are usually short and chubby, often bent slightly at the elbow, and ending in rounded paws or hands without distinct fingers. Her legs are also short and rounded, ending in simple, rounded feet. She doesn't have a tail in most depictions, which is something to keep in mind, so that is rather helpful.
You can draw her arms in various positions, perhaps with one arm slightly raised as if waving, or both arms down by her sides. Keep them relatively short and proportional to her body and head. The goal is to maintain her cute, compact appearance. Remember, Hello Kitty's design is about simplicity and softness, so avoid sharp angles or overly detailed limbs, which is, you know, pretty important for her character.
Finishing Touches and Details
Once you have the basic shapes of Hello Kitty's head, face, bow, and body, you can add some final touches to make her truly complete. These details are usually very simple but add a lot to her overall look. For example, Hello Kitty has a few whiskers on each side of her face, which are just simple lines extending outwards from her cheeks. Usually, there are three whiskers on each side, you know, just three.
You can also add a small, very simple oval or circle for her belly, or a few light lines to suggest the folds in her clothing if you are drawing her in an outfit. If she is wearing her classic overalls, you might add two simple straps over her shoulders and a small button on each strap. These details are subtle but contribute to her iconic look, which is, you know, pretty special.
After you are happy with your pencil sketch, you can go over your lines with a darker pencil or a fine-tipped black pen. This step makes your drawing stand out and gives it a clean, finished appearance. Once the ink is dry, you can gently erase any remaining pencil lines, leaving only your beautiful Hello Kitty drawing. This is a pretty satisfying part of the process, too, it's almost like magic.
Tips for Your Hello Kitty Art
Drawing is a skill that gets better with practice, and drawing Hello Kitty is no different. One helpful tip is to always start with light pencil lines. This way, you can easily erase and adjust your shapes without leaving messy marks on your paper. It allows you to experiment a bit and find the right proportions before committing to darker lines, which is, you know, a pretty good strategy.
Another great tip is to use reference images. Even though this guide provides step-by-step instructions, looking at official Hello Kitty artwork can help you understand her proportions and features even better. You can visit the official Hello Kitty website to see how she looks in various poses and styles, and draw the other characters as well, which is rather fun.
Don't be afraid to make mistakes. Everyone makes them, especially when learning something new. Think of them as opportunities to learn and improve. If a line doesn't look right, just erase it and try again. The process of learning is just as important as the final drawing, and it's pretty rewarding, too. Also, remember to take breaks if you feel frustrated; sometimes stepping away for a bit can give you a fresh perspective, you know, kind of like hitting a reset button.
This printable resource guides you on how to draw Hello Kitty and includes a final page with outlines for coloring, as well as an extension exercise designed to inspire creativity in children. This means you can practice your drawing skills and then use the outlines to experiment with colors or even create new outfits or backgrounds for Hello Kitty. It's a great way to keep the fun going and explore your artistic ideas, which is, you know, pretty cool.
Making Your Drawing Pop: Coloring and Creativity
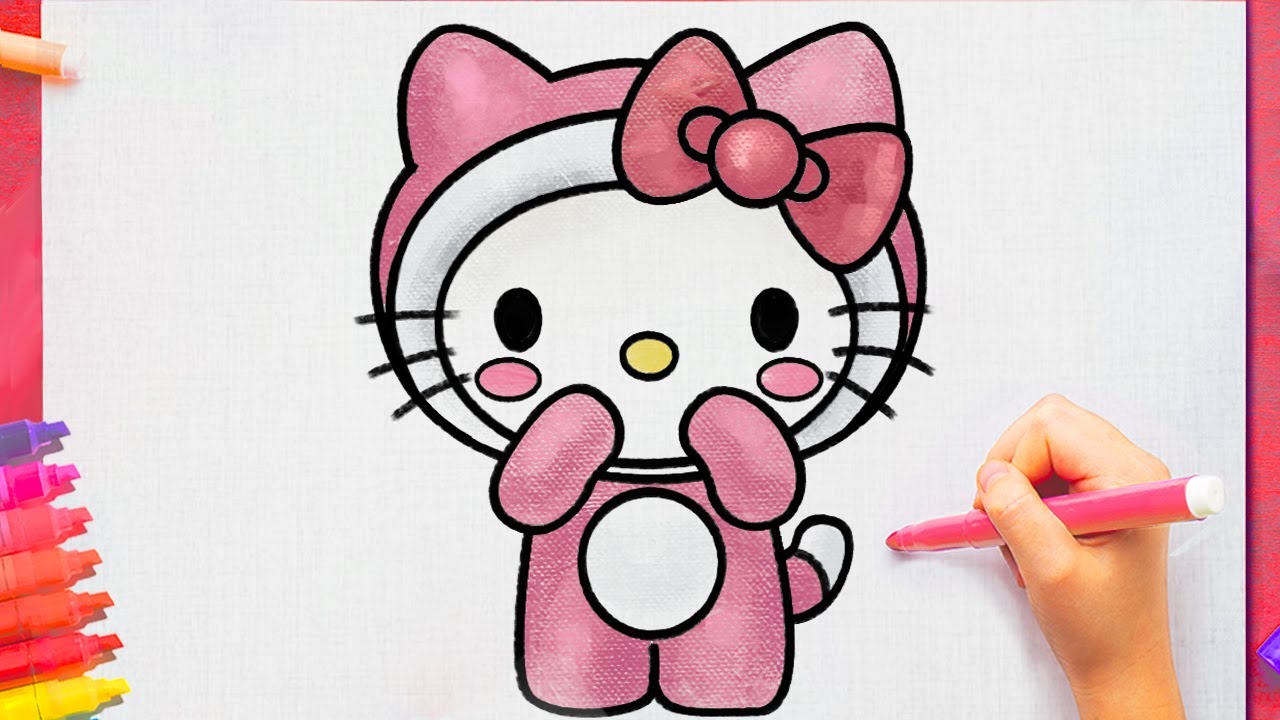
Once you have drawn Hello Kitty, adding color can really make her come alive. Hello Kitty's classic colors are typically white for her body, red for her bow, and yellow for her nose. You can use crayons, colored pencils, or markers to fill in these areas. Staying within the lines can be a bit challenging, but it helps make your drawing look neat and tidy, which is, you know, a good goal.
Beyond her traditional colors, you can also get very creative! What if Hello Kitty had a blue bow, or a rainbow bow? What if her outfit was polka-dotted instead of plain? This is where the extension exercise mentioned in the guide comes in handy. It encourages you to think outside the box and personalize your Hello Kitty, making her uniquely yours. You can even draw her in different settings or with other Sanrio friends, which is, you know, pretty imaginative.
Consider adding a background to your drawing. Maybe Hello Kitty is in a garden, or at a tea party, or even flying a kite! Simple elements like clouds, flowers, or a sun can add a lot to your picture and tell a little story. This step really lets your imagination run wild and gives your drawing more depth and personality. It’s a chance to make your Hello Kitty art truly special, which is, you know, a great feeling.
Common Questions About Drawing Hello Kitty
People often have questions when they are learning to draw, and that's perfectly normal. Here are a few common things people wonder about when drawing Hello Kitty, which might help you too.
Q: What if my Hello Kitty doesn't look perfect?
A: That's completely fine! Drawing is about enjoying the process and expressing yourself. Every artist, even very experienced ones, creates drawings that aren't "perfect" by some standard. The important thing is that you tried, had fun, and learned something along the way. Your unique style will show through, and that's what makes your drawing special, you know, really special.
Q: How can I make her look more like the official Hello Kitty?
A: To get closer to the official look, pay close attention to the proportions of her head, eyes, and nose. The size and placement of these elements are key. Also, remember her signature features: no mouth, simple black dot eyes, and a yellow oval nose. Consistent practice and using official images as a reference can help you refine your eye for her specific design, which is, you know, pretty helpful.
Q: Can I draw Hello Kitty in different poses?
A: Absolutely! Once you master the basic standing pose, you can start experimenting with different positions for her arms and legs. You might draw her sitting, waving, or holding something small. The core shapes of her head and body will remain similar, but you can adjust her limbs to create various actions. It's a great way to expand your drawing skills and add more life to your Hello Kitty art, which is, you know, a fun challenge.
Keep Drawing and Exploring!
Learning how to draw a great looking Hello Kitty with easy drawing instructions and a video tutorial is a fantastic start to your artistic journey. By following the simple steps, you too can easily draw a perfect Hello Kitty, and it's a pretty satisfying accomplishment. This guide is perfect for kids and beginners, offering a straightforward path to mastering this beloved Sanrio character in minutes, which is, you know, quite a feat.
We hope you had a lot of fun creating your very own Hello Kitty. Remember, the world of drawing is vast and full of possibilities. Don't stop here! Be sure to visit the official Hello Kitty website and draw the other characters too, like My Melody or Keroppi. There are so many adorable friends waiting for you to bring them to life with your pencils and colors, which is rather exciting.
Keep practicing your drawing skills every day, even if it's just for a few minutes. You'll be amazed at how much you improve over time. Drawing is a wonderful way to relax, express yourself, and create something beautiful. Stop by and grab your next drawing adventure today, and learn more about drawing tutorials on our site, and perhaps link to this page for more Sanrio characters. Happy drawing!
Detail Author:
- Name : Melody Mueller
- Username : devin.hirthe
- Email : randi04@cartwright.net
- Birthdate : 1998-11-01
- Address : 7850 Crooks Route West Allenbury, TN 41276
- Phone : 615-977-5579
- Company : Dickinson, Tromp and McLaughlin
- Job : Kindergarten Teacher
- Bio : Corporis itaque atque ut. Ex sit ea commodi quae a. Ut et aut minima in tempore doloremque. Expedita autem maxime eaque culpa ad asperiores.
Socials
facebook:
- url : https://facebook.com/maribel.nitzsche
- username : maribel.nitzsche
- bio : Autem repudiandae esse aspernatur et sit fugiat laborum.
- followers : 927
- following : 2885
twitter:
- url : https://twitter.com/nitzschem
- username : nitzschem
- bio : A eum quia est eum cum velit. Exercitationem minus ipsa eum dolores. Reprehenderit eum quibusdam unde quo voluptas soluta.
- followers : 5497
- following : 984
tiktok:
- url : https://tiktok.com/@maribel.nitzsche
- username : maribel.nitzsche
- bio : Sint pariatur omnis minus minima nobis dolore nulla. Ad excepturi et est.
- followers : 6188
- following : 789
instagram:
- url : https://instagram.com/nitzschem
- username : nitzschem
- bio : Deserunt vel voluptas repellendus eius enim suscipit. Rerum et nihil exercitationem voluptatem.
- followers : 3329
- following : 726


 Bonus
Bonus